

Recently, I needed to track 3D objects from a 2D camera in Unity. A problem that I assumed would be quite simple ended up being fairly complex, and here’s the solution I ended up with. There are still some issues so please comment if you know a better way or have improvements to suggest.
As usual, my first step to solving this was to look for existing solutions. I came across this forum post. The suggestion was to calculate the bounding box from the game object’s Renderer Bounds. Each vertex of the renderer bounds is converted to screen space and a bounding box is calculated using the min and max x and y values.
Create a BoundingBoxRenderer script and paste the below code within it.
using UnityEngine;
public class BoundingBoxRenderer : MonoBehaviour
{
    public GameObject target;
    void OnGUI()
    {
        Camera camera = GetComponent();
        Vector3[] pts = new Vector3[8];
        Bounds b = target.GetComponent().bounds;
        // All 8 vertices of the bounds
        pts[0] = camera.WorldToScreenPoint(new Vector3(b.center.x + b.extents.x, b.center.y + b.extents.y, b.center.z + b.extents.z));
        pts[1] = camera.WorldToScreenPoint(new Vector3(b.center.x + b.extents.x, b.center.y + b.extents.y, b.center.z - b.extents.z));
        pts[2] = camera.WorldToScreenPoint(new Vector3(b.center.x + b.extents.x, b.center.y - b.extents.y, b.center.z + b.extents.z));
        pts[3] = camera.WorldToScreenPoint(new Vector3(b.center.x + b.extents.x, b.center.y - b.extents.y, b.center.z - b.extents.z));
        pts[4] = camera.WorldToScreenPoint(new Vector3(b.center.x - b.extents.x, b.center.y + b.extents.y, b.center.z + b.extents.z));
        pts[5] = camera.WorldToScreenPoint(new Vector3(b.center.x - b.extents.x, b.center.y + b.extents.y, b.center.z - b.extents.z));
        pts[6] = camera.WorldToScreenPoint(new Vector3(b.center.x - b.extents.x, b.center.y - b.extents.y, b.center.z + b.extents.z));
        pts[7] = camera.WorldToScreenPoint(new Vector3(b.center.x - b.extents.x, b.center.y - b.extents.y, b.center.z - b.extents.z));
        // Get them in GUI space
        for (int i = 0; i < pts.Length; i++) pts[i].y = Screen.height - pts[i].y;
        // Calculate the min and max positions
        Vector3 min = pts[0];
        Vector3 max = pts[0];
        for (int i = 1; i < pts.Length; i++)
        {
            min = Vector3.Min(min, pts[i]);
            max = Vector3.Max(max, pts[i]);
        }
        // Construct a rect of the min and max positions
        Rect r = Rect.MinMaxRect(min.x, min.y, max.x, max.y);
        GUI.Box(r, "");
    }
}
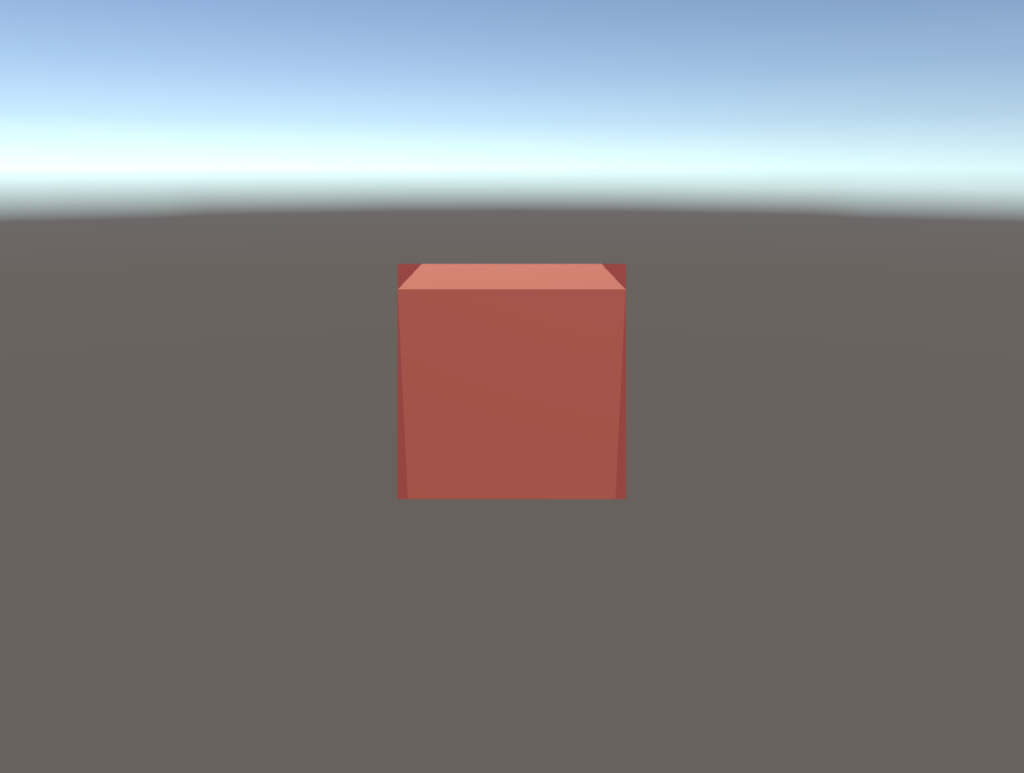
Attach the script to the camera you want to track an object from and supply the game object of your choice to the “target” field. Running this script on a Cube appears to work great.
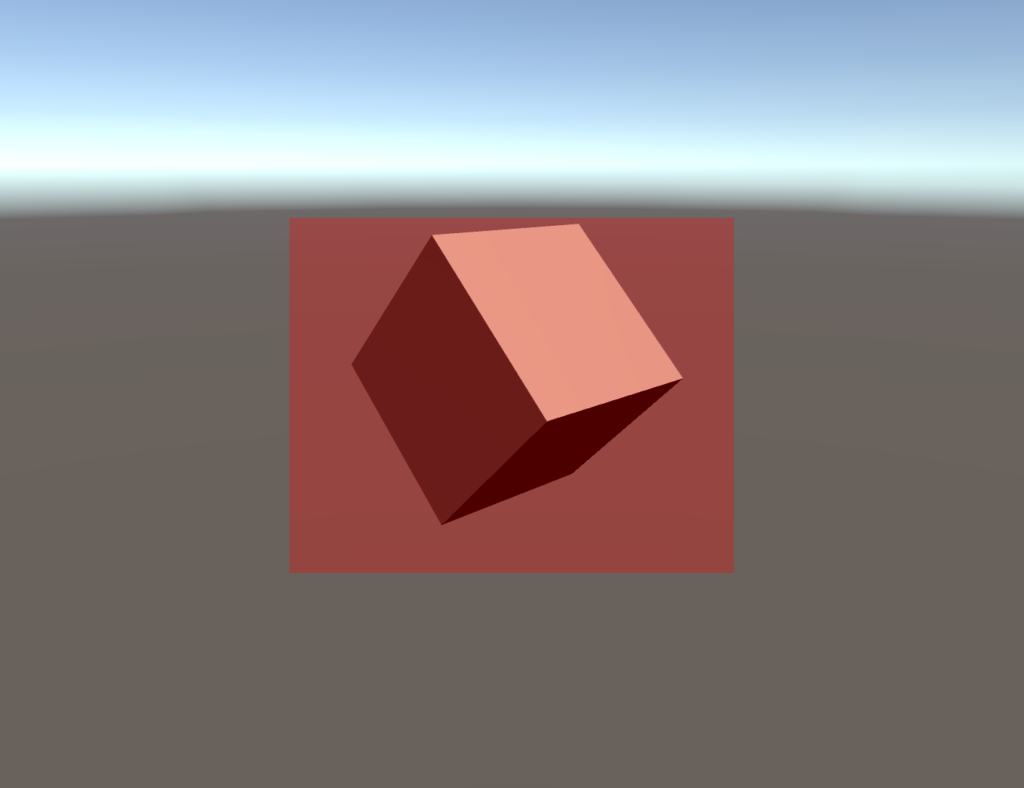
However, when the object is not aligned with the x, y and z axis, it doesn’t seem to do so well.
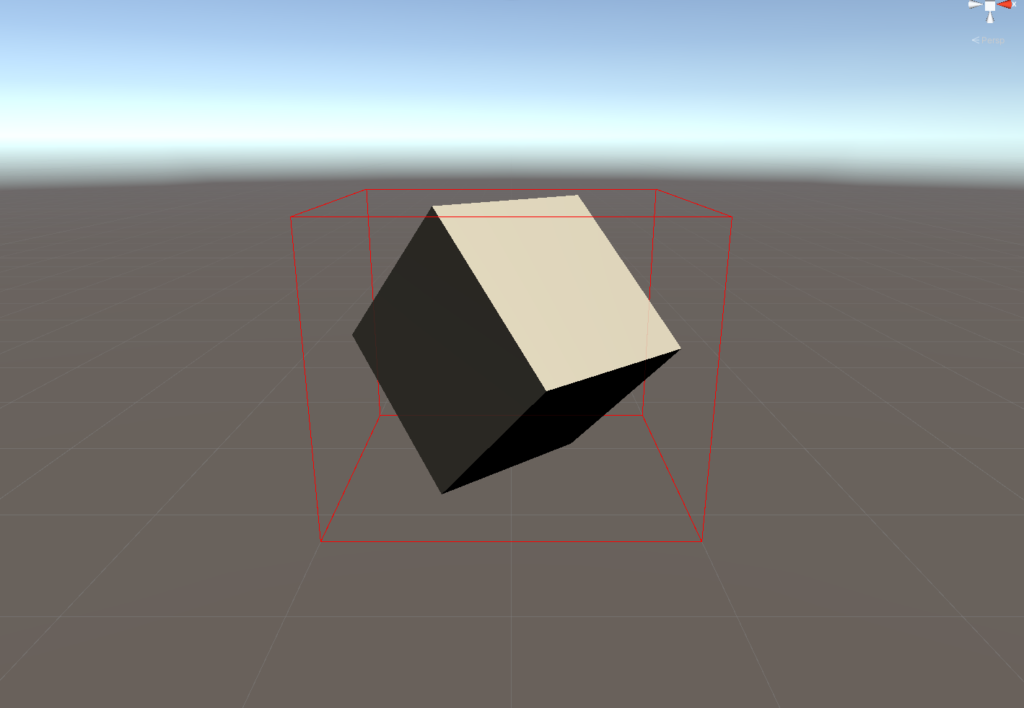
This seems like strange behaviour, but if we display the bounds, we can see why this occurs.
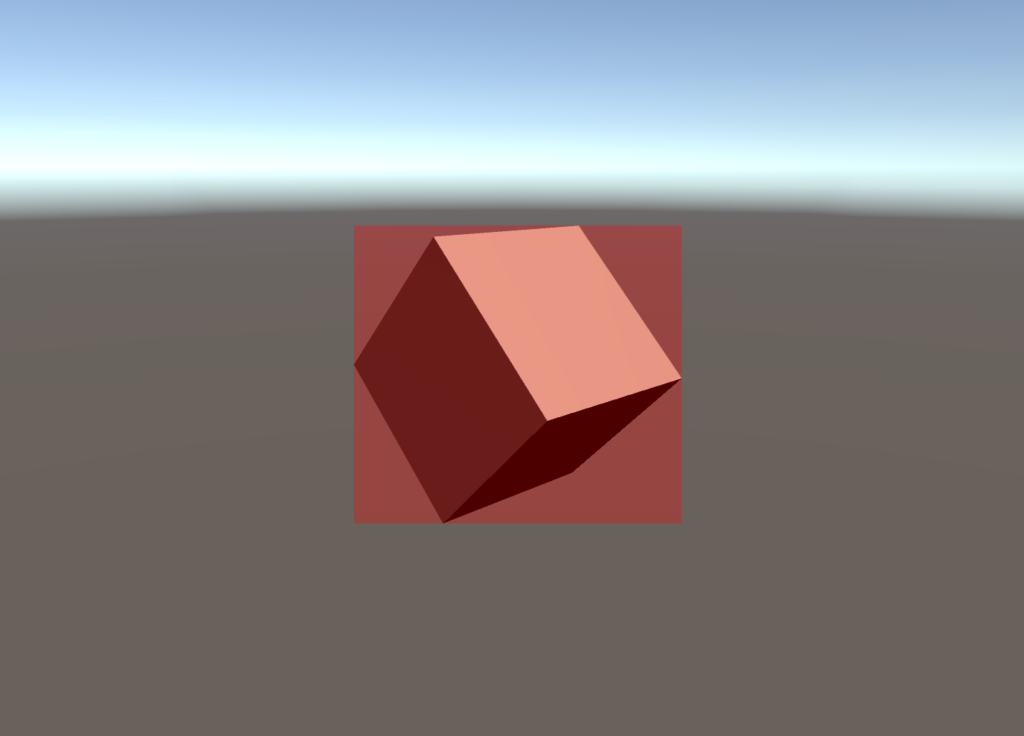
Luckily, this problem was pointed out and already solved here. The solution uses the vertices of the object to calculate the bounding box. We get the vertices of the object from the mesh, and then same as before we convert the points to screen space and calculate using the min and max x and y values. It works great.
Camera camera = GetComponent();
Vector3[] vertices;
vertices = target.GetComponent().mesh.vertices;
for (int i = 0; i < vertices.Length; i++)
{
    // World space
    vertices[i] = target.transform.TransformPoint(vertices[i]);
    // GUI space
    vertices[i] = camera.WorldToScreenPoint(vertices[i]);
    vertices[i].y = Screen.height - vertices[i].y;
}
Vector3 min = vertices[0];
Vector3 max = vertices[0];
for (int i = 1; i < vertices.Length; i++)
{
    min = Vector3.Min(min, vertices[i]);
    max = Vector3.Max(max, vertices[i]);
}
// Construct a rect of the min and max positions
Rect r = Rect.MinMaxRect(min.x, min.y, max.x, max.y);
GUI.Box(r, "");
Replace the code in OnGUI() with the above.
The issue I had here is that this only works for objects with a regular Mesh Renderer and a Mesh Filter. I needed to track objects that were using Skinned Mesh Renderer, which doesn’t have an associated Mesh Filter and gives no way to directly access the runtime mesh.
The Skinned Mesh Renderer doesn’t allow us to directly access the mesh in the same way a Mesh Filter does, but it does allow us to retrieve the shared mesh. The mesh retrieved from the Mesh Filter gives us a copy of the mesh instance during runtime. Alternatively, the shared mesh is the mesh asset itself. It gives us no information on the mesh’s current runtime position, which is pretty useless for tracking objects.
To solve this, we can use the skinnedMeshRenderer function BakeMesh. This creates a snapshot of the real time mesh and stores it in an empty mesh we give it.
Camera camera = GetComponent();
SkinnedMeshRenderer skinnedMeshRenderer = target.GetComponent();
// Get the real time vertices
Mesh mesh = new Mesh();
skinnedMeshRenderer.BakeMesh(mesh);
Vector3[] vertices = mesh.vertices;
for (int i = 0; i < vertices.Length; i++)
{
    // World space
    vertices[i] = target.transform.TransformPoint(vertices[i]);
    // GUI space
    vertices[i] = camera.WorldToScreenPoint(vertices[i]);
    vertices[i].y = Screen.height - vertices[i].y;
}
Vector3 min = vertices[0];
Vector3 max = vertices[0];
for (int i = 1; i < vertices.Length; i++)
{
    min = Vector3.Min(min, vertices[i]);
    max = Vector3.Max(max, vertices[i]);
}
Destroy(mesh);
// Construct a rect of the min and max positions
Rect r = Rect.MinMaxRect(min.x, min.y, max.x, max.y);
GUI.Box(r, "");
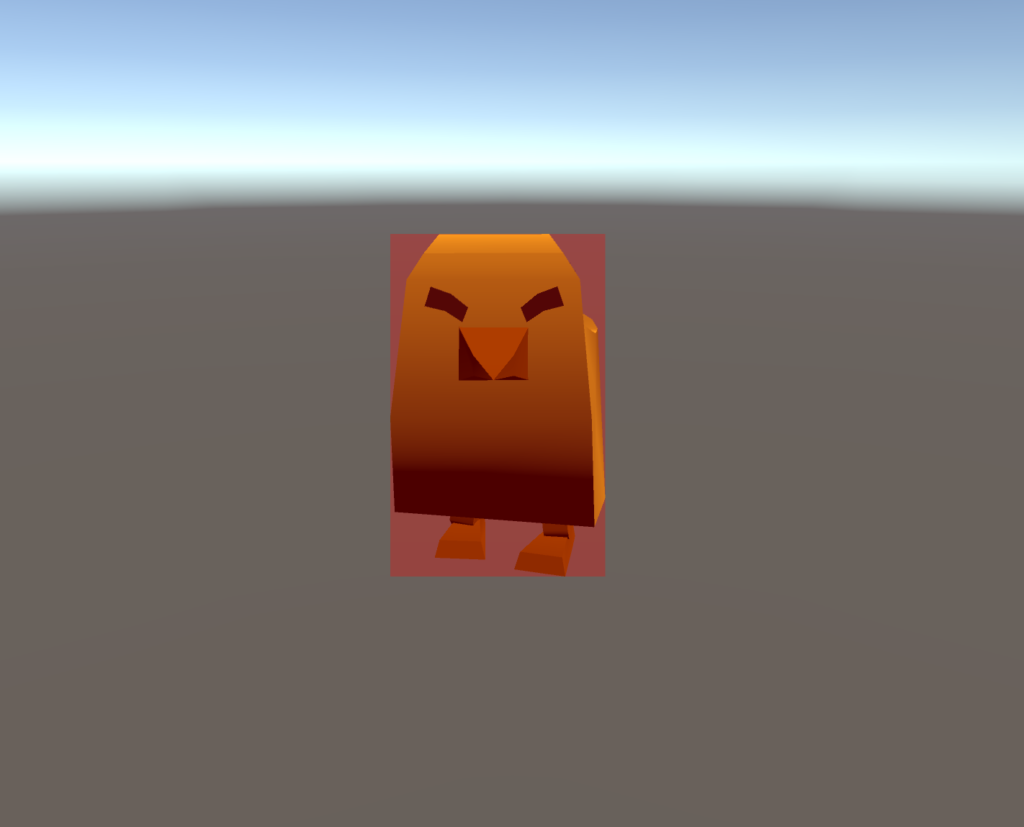
Replace the code in OnGUI() with the above. Once we’ve done this, we can draw bounding boxes around a Skinned Mesh Renderer. Here’s the asset I used to test this (though this will work for any object with a Skinned Mesh Renderer attached). Using the “Toon Chick” prefab from this asset pack, set the object within this prefab that has the Skinned Mesh Renderer attached to it, as the target for our script. If we give this a try we should get the following output:
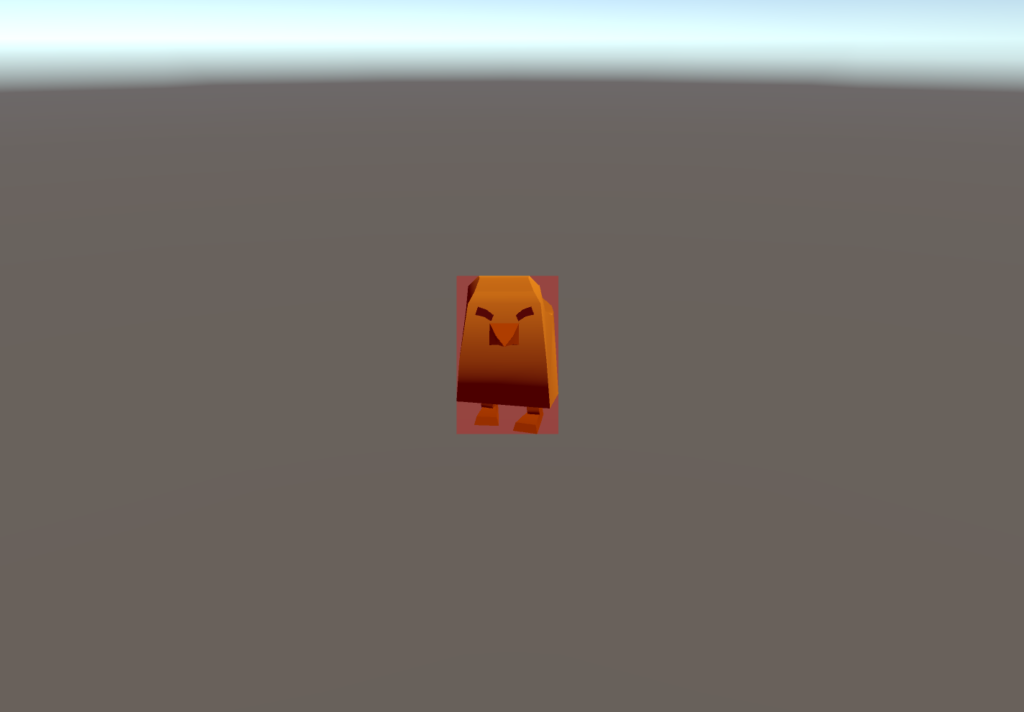
This works great when the global scale of the object is 1. If we adjust the scale, we get this:

That’s not right. But we’re almost there. Frustratingly, BakeMesh has a quirky feature where it applies the global scale of the game object with the SkinnedMeshRenderer to the vertices. To counteract this, we just need to temporarily set the scale to 1 before we use the function.
SkinnedMeshRenderer skinnedMeshRenderer = target.GetComponent();
// SkinnedMeshRenderer scales resulting mesh by global scale when BakeMesh() is used, so need to prevent this
// Can't manipulate global scale directly so need to do a little trick
Vector3 localScale = skinnedMeshRenderer.transform.localScale;
Transform parent = skinnedMeshRenderer.transform.parent;
skinnedMeshRenderer.transform.parent = null;
skinnedMeshRenderer.transform.localScale = Vector3.one;
skinnedMeshRenderer.transform.parent = parent;
skinnedMeshRenderer.transform.localScale = localScale; // Reset scale
Destroy(mesh);
Add in the above snippets. If we run it again, we’ve got it working pretty nicely!
A couple of things to note are that we must make sure that any mesh that we are tracking is read enabled (select the model in the Project window and set “Read/Write Enabled” to true in the Inspector), and the object has static batching turned off. Doing this will have performance implications.
Also, as you likely aren’t surprised, this method gets very expensive with objects that have many vertices. If anyone knows a way of solving this problem more efficiently while retaining the accuracy, please let me know.
Here’s my final source code. It works on both MeshRenderers and SkinnedMeshRenderers. It also has a few extra features, such as using the Unity UI to draw the bounding box, the ability to track multiple objects, the ability to track multiple meshes as if they were one, and providing events for bounding box calculations that another script can subscribe to.